
WDS: UEFI Boot & Legacy Boot – PXE DHCP Option
Manual Option settings
DHCP Option 67: UEFI 64 Boot
boot\x64\wdsmgfw.efi
DHCP Option 67: Legacy Boot
boot\x64\wdsnbp.com
Automatic DHCP Policies
Create Custom Vendor Classes
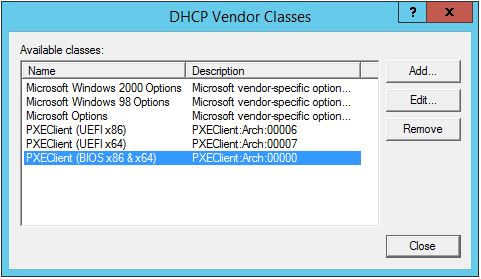
Custom Vendor Classes are detection methods used to determine how the target computers are requesting to boot a image from the DHCP server. It is required to create three classes for three different boot mode: Legacy BIOS (32 and 64bit), UEFI (32bit) and UEFI (64bit). Follow the steps given below to create three classes.
- Open the DHCP Console and expand the IPv4 Node
- Right-Click on ‘IPv4 Node’ and select Define Vendor Classes
- Click Add
- Create the UEFI 64-Bit Vendor class by entering the following information:
DisplayName: PXEClient (UEFI x64)
Description: PXEClient:Arch:00007
ASCII: PXEClient:Arch:00007
- Click OK, click Add
DisplayName: PXEClient (UEFI x86)
Description: PXEClient:Arch:00006
ASCII: PXEClient:Arch:00006
- Click OK, click Add
DisplayName: PXEClient (BIOS x86 & x64)
Description: PXEClient:Arch:00000
ASCII: PXEClient:Arch:00000
Creating the DHCP Policies
Now we’re going to create policies in DHCP so that the correct files are served to the correct clients. You will need to do this for each DHCP scope.
Go to DHCP and expand the scope you wish to create a policy for.
Right-click on Policies and choose New Policy.
Enter PXEClient (UEFI x64) for the name.
Enter a Description, or leave it blank. Click Next.
On the Configure Conditions for the policy screen, click Add.
In the Add/Edit Condition window, click the Value: drop down menu.
Choose the PXEClient (UEFI x64) vendor class you created earlier.
Tick the Append wildcard(*) check box and then click Add and finally OK.
Click Next on the Configure Conditions for the policy screen.
On the Configure settings for the policy screen, click No for the Do you want to configure an IP address range for the policy. Click Next.
If DHCP is on the same server as WDS, you will need to set option 060, if WDS is on a different server, you do not need to set option 060.
On the Configure settings for the policy screen, scroll down until you see options 060 (if applicable), 066 and 067.
Tick option 060 and enter PXEClient (if applicable).
Tick option 066 and enter either the FQDN or the IP address of the WDS server.
Tick option 067 and enter boot\x64\wdsmgfw.efi - this is the x64 UEFI boot file for WDS. Click Next.
On the Summary screen, if all the details are correct, click Finish.
Now repeat all the for PXEClient (UEFI x86) with boot\x86\wdsmgfw.efi as option 067.
Repeat once again for PXEClient (BIOS x86 & x64) with boot\x64\wdsnbp.com as option 067 and leave option 060 empty.
Don’t forget to repeat the above for each VLAN you wish to PXE boot from and delete any default 060, 066 and 067 options set. Now in DHCP, if you expand the Scope Options folder you should see the new options you just created and under policy name should be the names of the policies you just created. You should be able to boot both a UEFI and BIOS devices from the network. Please note, if DHCP is installed on the same server as WDS, you will need to check both the Do not listen on DHCP ports and Configure DHCP options to indicate that this is also a PXE server options. I do not currently have DHCP and WDS on the same server, so I cannot reliably test this on a multi VLAN network.